Wednesday, 25 April 2012

RAVE Review: Macadamia Healing Oil

I have always been sceptical about hair oils but I have finally found the GOD of all hair products! Having naturally greasy hair I was worried that it was going to make my hair worse but thank goodness I didn't let that stop me!!

Being a non-natural blondie..I sometimes found my hair feeling quite dry and brittle on the ends, especially after using straightening/curling irons so was looking for something that would help with that but without making my hair more greasy at the roots. Ive been using the hair oil everytime I washed my hair, just before blowdrying. After the normal shampoo and conditioner, I towel dried my hair and using literally a pea size amount rubbed it through my hair with my hands. When my hair was feeling particularly dry I used an extra amount on the ends and the results were amazinnnnnng!

I've taken two pictures one before using the oil and another a week after using it, I'm a bit worried about putting them on as the results are SO different! The pictures are taken just after blowdrying and I have not used any irons or styling lotions in either picture.
The picture on the left is the before and the right after!

I still cannot believe the difference the oil has made! Its not only helped with my dry ends but also has made my hair feel sooo silky! It's even changed the colour of my hair- I haven't had it dyed between these photos being taken. The brassyness of the bleach used in my highlights has been toned down which I LOVE as theres nothing worse than yellowy looking highlights!

The product itself comes in many different sizes, I went for the 125ml bottle as it comes with a pump which makes it even easier to use! (The packaging is also so pretty and delicate!) When using it I tend to use just one to two pumps of the oil, and work it throughout all of my hair. The product smells SO good and lasts throughout your hair until the next wash! You can also use the oil as a leave in hair masque but as of yet I haven't had chance to try it this way but defo will some time in the very near future!

The Macadamia Healing Oil Treatment  claims to:
  • intense nourishment for tangle & frizz free hair
  • hair that is ultra-smooth, manageable & shiny
  • natural UV protection extends the life of color treatments
  • reduced drying time by an amazing 40-50%
...and I can definitely agree that it does all four! Not only does my hair feel smoother but also looks much healthier. I bought mine from Amazon for around £15-£18 which is kind of average for most hair oils but considering the amount you actually use it will last for so long so is a good investment! (Some salons in the UK also stock it too!)

If I had to find a negative, its that I didn't use it sooner!
What are your must have hair products?!

xoxo

Monday, 16 April 2012

How to... Lip enhancing

We all crave for that perfect pout and try out serums and lotions and even surgery for that amazing Angelina Jolie lip shape, however there are other ways of enhancing your lips without going to the extremes of having chemicals injected into them!

There are ways in promoting what you already have rather than completly changing it! So here is my four simple steps to improving your lips!

  • Firstly I take a lipbalm to hydrate the lips. I use Palmers Cocoa Butter Formula Lip Balm, which not only helps nourish chapped or cracked lips due to it being packed with Vitamin E but provides deep hydration to the lips because of its 100% pure cocoa butter formula. It also contains SPF 15 which is an extra bonus and will protect your lips from everyday sun exposure! Moisturizing your lips with a product like this everyday, especially before lipstick/gloss is sooo essential as it gives your lips that added moisture to look and feel fantastic and for £1.83 who can say no!
  • I next take a lip liner.. for this I have used a Bobbi Brown lip liner in the colour Red. Lip liners really don't get enough credit! I sometimes use them underneath lipsticks/glosses or even smudge them and wear them alone. Bobbi brown have some GREAT colours and are so pigmented that not a lot is required soo they really are an investment buy they last for so long!!! At this stage I trace around the edge of my lips- dont worry if it is not perfect! On the bottom lip take the liner slightly below the edge of the lip this slight adjustment will make a HUGE difference!
  • Next I carefully blend in the lip liner into my moisturized lips. Using your little finger carefully work the liner into the lip so it remains darker on the edge of your lips but still covers your lip. If you want a more extreme colour just add more lip liner
  • At this stage you will see a difference in your lips and they will look much fuller. You can leave your lips at this stage and either take some more balm and gently dab it on with your finger for an effortless look or put a lipstick on top. I have used MAC's amplified lipstick in Chatterbox. It is a bright pink that is wearable throughout the day with its slight coral tones running through it.
    Step 1                                                                       Step 2
    Step 3                                                                       Step 4

The great thing is about applying moisture balm to your lips before lipstick is that the colour lasts longer and doesnt dry your lips out like a lot of lipsticks do. Liners are GREAT for enhancing what you already have and the range of colours mean that there is definately one for everybody!

What are your favourite colours and lip regimes?

Thursday, 12 April 2012

Review: Spot-Busting

Hii

So recently I have not had the best of times with my skin and like everyone who has ever experienced it, I've had the dreaded break out! I've tried loads of things to help calm and soothe my skin but recently NOTHING has seemed to work. However I have recently become OBSESSED with Lush skincare products. Most people assume that Lush is simply bath bombs and smellies but that is not the case at all! For those of you who have never tried it I strongly suggest you do! So many things to choose from haircare to skincare to even toothpaste! All of which are made from natural sources! Great for sensitive skin!

I have combination skin which can be a complete pain in the bum for alot of people! It can be hard to identify and even more difficult to treat! Combination skin typically is when two or more different skin types occur on your face at the same time. For me I get quite a dry forehead but at the same time the centre of my face- nose and chin can be quite oily. However recently my skin has become an even bigger nightmare! As I've said i've recently had lots of break outs particularly on my T-Zone area.

Anywaaay I went to Lush last week solely to find a cure for my skin. The sales advisor at Lush was soo helpful (thats another thing about Lush the sales advisors really know what they're talking about and are SOOO friendly!) and told me something I hadnt really thought of doing before.. basically as I have combination skin I need to use products that wont make the oily bits more oily and the dry parts more dry.. which when using moisturisers and spot treatment can be quite difficult. She suggested using moisturisers only on the dry part of my face until my skin had calmed down and using a spot treatment on the oily part of my skin replacing the moisturiser. Not only does the moisturiser keep my skin less oily in the places it doesnt need it but it prevents me spreading the break out to other parts of my skin. So.. I left Lush with a spot treatment which so far has been soo good in calming down not only the spots but also the redness around them without drying up my skin in patches.

I cleanse my face with Liz Earle Cleanse and Polish, next I spritz Elemis Lavender Toner over my face and leave that to sink in (This is a great product which helps balance pH levels of the skin without containing alcohol meaning it is a must have for combination skin!) Now this is where I have changed my skincare routine, instead of using moisturiser all over my face I only moisturize the parts that actually need it, the parts with the breakout is where I use my fandabbydoseeeey new find!

.........Lush's 'Grease Lightening'

The product is a combination of natural ingredients and applies as a clear gel. It contains Carrageen moss a seaweed that helps the skin around the spot not dry out (which alot of spot treatments do) and which also means no redness when the spot has gone! It also contains-

  • Aloe vera gel to soothe and moisturise.
  • Seawater for its antiseptic properties.  
  • Grape juice to cool and calm the skin. 
  • Thyme, rosemary and tea tree herb infusions to be gently antibacterial.
  • Witch hazel, an astringent that is great for bruising and helps broken blood vessels shrink and contract.
  • Tea Tree oil, a powerful antiseptic

  • All of these natural ingredients is what attacks the spot without drying up the skin or making it too oily! I have only used it for a week and already my skin has cleared up so much! The great thing is too that you don't need to use it everyday but only when you feel like your skin is going to break out and so can catch the spots before they attack! You can also apply it under make up as it creates almost a seal which keeps makeup out although I found it worked best before going to bed/ straight after a shower when your skin was at its cleanest.
    It has quite a strong scent but isnt off putting, it also doesnt remain on your skin greasy for a long period of time which drives me crazy but actually sinks in pretty fast.
    I was a bit wary about using it as most spot treatments claim to be miracle solutions but this actually works and if like me you are prone to the occasional break out it is an essential for your beauty bag!

    What are your favourite spot busting treatments!?

    How to...Galaxy Nails

    Sooo... I have been trying to find a new nail design and have FINALLY found one. Not only is it soo simple to do but looks amaaaazing!

    All you need is a few nail polishes, an old make up sponge or cotton pads and obviously your nails!

    The Nail Polishes I've used are a mixture from Topshop's own range to Barry M. You don't need as many as this you can get away with using just three of the colours but I want to show you the range of colours that can be used!


    Barry M Nail effect in Black
    
    No 7 Stay Perfect Nail Colour in Totally Teal

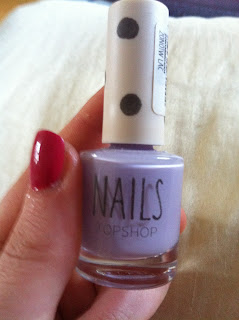
    Topshop Nail Polish in Parma Violet

    
    Topshop Nail Polish in Blitz
    
    
    Topshop Nail Polish in Cosmic Karma
    
    
    Stargazer Glitter Polish

     It may seem a bit extreme to use ALL of these colours but Ive just put a range of colours to show which ones would work best.. using just 3 of these would work just as well!

    • Firstly use the Barry M nail effect polish on a clean nail, (this may seem odd but it allows the clear nail to come through for other colours to be put on top.) Wait for the first layer to dry then apply another layer this time dabbing it down with a corner of the sponge. It may at this stage look a bit messy but its ok! (Also instead of this point pre-painted black nails willl work just as well!)
    • After the second layer has dried this is where you can choose which colours to use.. I used the teal colour at this stage.. but the Lilac colour (Topshop's Parma Violet) would work just as well! Taking the sponge lightly dab the colour onto one corner, then start to fill in any gaps on your nail dabbing over the nail with the sponge. Do this to all nails and wait to dry.
    • Next taking a shimmery colour, I used both 'Blitz' and 'Cosmic Karma'(Topshop nail polishes are great for these types of colours and range from £5 to £7 making them an even better investment!) do the same as step two. Less is certainly more with this nail art, try not to add too much product to the sponge as you can always repeat over the colours.
    • I tried to alternate the colours, for instance on one finger adding the pink colour at the top of the nail and the bluey colour near the nail bed and blending it all together.
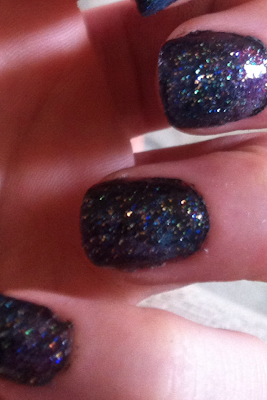
    • After the nail has dried you'll be able to see a pattern forming.. looking a bit like the GALAXY-hence the name! Finally add the translucent glitter polish and hey presto you have your own solar system on your nails! A top coat is optional I found that the glitter polish worked just as well!


    The colour has lasted over a week without any chipping and I have had loads of compliments! In the day time it looks so pretty and glittery without looking too over the top, and can be worn on nights out too which makes it a perfect nail art pattern to choose! Although it may seem complicated with the different colours and sponges etc I can honestly say its not as scary as it looks I am no nail art professional  and was extremely pleased with the results!

    Try it out for  yourself!